This is a walkthrough for the adult version of Winged Cloud’s Sakura Dungeon, available over at Nutaku or Denpasoft. Sakura Dungeon is a RPG/Dungeon crawler game, and once completed, this walkthrough will have map guides for all floors in the game. It’s targeted for the “Normal” difficulty of the game, and should also work for the all-ages Steam version but this is untested.
This guide won’t help you in the actual battles or with choosing your party members and attacks so feel free to use your own judgement in these. Also feel free to save whenever you like.
There are 2 parts in this guide. The first part will provide generic info and information on how to unlock certain events. This list will slowly be expanded depending on my own progress. The second part will contain maps of all floors and a generic guide on how to move around the floors and which chests, barrels and other map items are useful.
It’s done, no longer in progress! Last update 2017-13-01, formatted the event list a little better.
Parts
- Part 1 (Current page)
- Part 2
Generic game info and unlocks
Battles
Random battles will occur while you explore the various dungeon floors. A battle will also happen once you step onto a battle square. Enemies may yield a special scene if defeated for the first time. Also, a capture skill will be available soon enough. The capture skill requires your character to be higher level or equal level to the enemy you’re targeting in order to capture them. Sometimes recruiting them will give you their CG, like for the Cat Witch for example.
Seeds
The various seeds that you’ll find can raise a party member’s specific stat, like vitality. There are both small and large seeds, save the latter ones for when the small seeds no longer have any effect.
Walk around town events
| Title | Requirements | Unlocks |
|---|---|---|
| Look for treasure. | Reached floor 3 | Defeat Cat (lv9) for CG |
| See how Ceri is doing. | Reached floor 4 | |
| See how Ceri and Sylvi are doing. | Reached floor 4 Recruited Sylvi |
|
| Talk to the fox tamer. | Recruited Fox Tamer | Fox Tamer CG |
| Check in with the witch. | Recruited Witch | Witch/Yomi CG |
| Teach Ceri a new skill. | Finished floor 8 Yomi in party Capture skill |
Astral Blade |
| Check out Charlotte’s curios. | Unlocked floor 5 Unlocked new items |
Bodypaint CG |
| Spend some quality time alone. (Adult only) |
Unlocked floor 11 | Yomi CG |
| Pay a visit to the archery range. | Recruited Fox Archer | Fox archer CG |
| Take some time to speak with Sylvi. | Unlocked floor 14 Talked with Sylvi |
Sylvi/Slime CG. |
| Walk through the bamboo forest. | Encountered Panda | Defeat Panda (lv30) for CG + Plant Fibers |
| Visit Ceri’s guild. | Defeated Panda | Recruit Maeve |
| Talk to Maeve. | Floor 15 Recruited Maeve |
Recruit Maeve |
| Check in with the tiger.. (Adult only) |
Recruited Tiger | Ceri/Tiger CG |
| See if the tiger girl has gathered her companions. (Adult only) |
Saw previous event | Ceri/Tigers CG |
| See if Ceri would like a bath. (Adult only) |
Floor 16 | Mud Bath CG |
| Ask Ceri more about Maeve. | Floor 16 Talked to Maeve |
|
| Invite Maeve for a mud massage. | Floor 17 Talked to Maeve (x2) |
Maeve Mud CG |
| Introduce Ceri to some artifacts. | Floor 18 Talked to Maeve |
Maeve CG |
| Go to the beach. | Floor 18 Have Bikini/Swimsuit |
CG Captain Bonny |
| Administer a punishment for that assassin. | Floor 19 assassin defeated Town assassin defeated |
Assassin CG |
| Ceri has been acting strangely. | Lingerie clothing Recruited Hammer |
Ceri/Hammer CG |
| Help Sylvi overcome her shyness. | Floor 21 Finished Sylvi events |
Sylvi/Genie/Forest Spirit CG |
| Talk to Isabella and Charlotte. | Lucky Statue completed 10 outfits |
Isabella/Charlotte CG |
| Enjoy some time in the meadow. | Floor 22 | |
| Have a chat with that sultry whip wielder. | Whip Wielder defeated | Whip Wielder CG |
| Have another browse through Charlotte’s curios. | Bondage outfit | Ceri CG |
| Talk with Ceri about what is bothering her. | Floor 25 | |
| Call Ceri to see if she is ready. | Talked with Ceri Yomi not in party |
Defeat Yomi (lv56) for CG |
| Talk to Ceri about our battle. | Defeated Yomi | Ceri/Yomi CG |
| Use that abyssal shard. | Found abyssal shard | Yomi CG |
| See if the succubus is doing fine in her cell | Recruited Succubus | Succubus CG |
| See how Sylvi and Ceri are getting along now. | Seen epilogue | |
| Investigate rumours regarding a ghost. | Seen epilogue | Defeat Spirit Guardian (lv64) to recruit her |
| Check on the spirit guardian. | Recruited Spirit Guardian | Spirit Guardian CG |
| Check on Vesta. | Defeated Vesta | Vesta CG |
| See how Hiriko is doing. | Floor 30 defeated | Hiriko CG |
| Talk to Izanami.. | Defeated Izanami | Izanami CG |
Now, there’s a last one that requires some more info:
Go to the room of seals. -> To unlock this take the Ryuu to throne room floor 16 to talk. Go through all options to unlock new CG and new party members. Once unlocked, defeat the level 70 boss for new fabric.
Shop
The items that you can buy in the shop will slowly increase as you progress. There will also be some events that open up later on.
Battle with level 15 warrior -> Unlocked floor level 8, unlocks warrior CG
Dungeon levels
Dungeon entrance, level 1
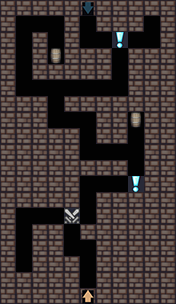
Make your way past the first battle and the event point. Then proceed towards the barrel north of the first event (not marked on the map) and click it to get 5 mana shards.
You can ignore the second barrel in the top left since there’s nothing inside, so make your way to the topmost event. If you encounter the rabbit again make sure to capture her.
After seeing the final event, go down to the next level.
Dungeon entrance, level 2
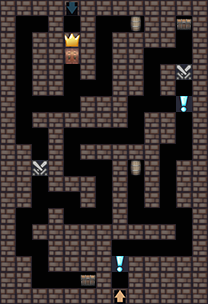
Head forward past the event and ignore the barrel at the first fork. Make your way to the second event point (east) then head on towards the battle event. Defeat the Boar girl by capturing her (If you hadn’t already done so). Grab the chest to the north after that to get a healing potion.
Feel free to warp out and add the rabbit and boar to your party (Don’t buy a new warp stone). Then head back inside to make your way back.
After the first chest make your way down towards the second chest to obtain a Fire Twist scroll, then back north to the second battle. After that, ignore the gate and head for the barrel up north to get a new warp stone. Now go through the gate (Click it twice) and defeat the Slime boss. Then go to level 3.
Castle entrance, level 3
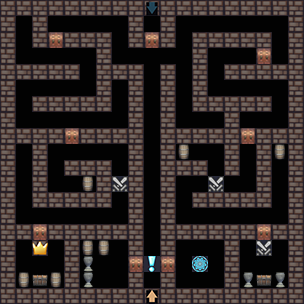
(Remember, you can organize your party however you want it).
Head forward to get the first event then go through the right door and unlock the teleporter. After that head back to the other door and break all of the vases and barrels to get a healing potion and a small vitality seed. Head back out and go north, then west, through the 2 doors down south and check the barrel for a warp stone. Loop back out of the dead end and continue your way to the battle event. Once defeated, continue down to the last room + boss battle, and open the chest for a fabric scrap.
Warp out or make your way back north to start on the east side of the map, moving around the north wall to go through the first 2 doors and towards the next battle. After completing the battle move further down to enter the last room, awaiting another big battle inside. Open the chest to get the key for the north door. Go north to go down to the next floor.
Castle entrance, level 4
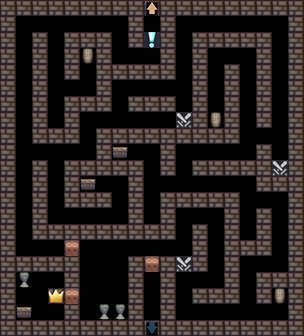
You start this map at the top, head through the corridor and then down at the first split to get to the first barrel which will get you a small resilient seed. Head back up and then down along the west side of the map. Switch east at the first fork in the middle of the map then south to reach a chest with 300 mana shards.
Head back out of this corridor and make your way northeast, taking on the battle event in the corner. After the battle head north, east and south respectively, until you find another battle at the dead end. Once defeated go 2 squares up and west through the fork until you reach the second chest. It’ll give you a Dancer Scrap to unlock a new outfit.
Now go east and down to the barrel in the bottom right corner for 25 mana shards. Then go all the way to the bottom left door, right through the battle event and past the door leading to the exit (One of the vases in the big room yields 25 mana shards). Enter the bottom left chamber to fight the Witch. You’ll find a Whirlwind scroll in the chest afterwards, then head on towards the next floor.
Castle Midpoint, level 5
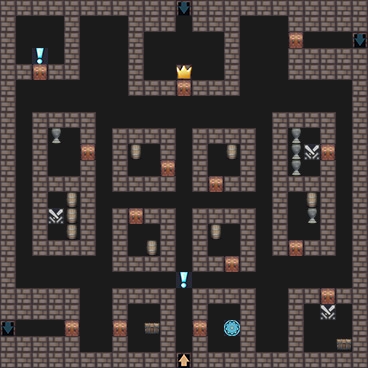
Note that this map has 3 staircases leading down. The west one leads to level 6, the northeast one to level 7, and the north one to level 8.
Immediately go into the door on the right and unlock your teleporter. Use it to go back to unlock Sylvi and your new outfits (if you hadn’t done so just yet). Also be sure to stock back up and do your “Walk around town” events.
Head north to the junction event, then west and south into the room with the first chest, in which you’ll find a swimsuit scrap. Once received, go out of the room and up by the most western corridor (Ignore the door with the stairs to the next level) and head inside the first room you find. After the battle you’ll find a warding stone in the northernmost barrel.
Go back out of the room and enter the room directly east of it. In the barrel you’ll find 50 mana shards. Ignore the other rooms in the center and head to the most southeastern room for a fight and a reviving balm from the chest.
After getting the balm head to the room directly north of this one and open the vase for 30 mana shards. Now follow the eastern corridor north and enter the room with the 3 vases and the battle event. You’ll find a mending tonic in one of them.
Now, you can’t go to the boss on this floor just yet, first you’ll need to obtain keys from both level 6 and 7. So grind some levels if you need to, then go to the room in the northwest corner to find the library and fight a level 15 sword witch and get a Fire Slash scroll as well as an Operation Spell if you defeat her.
Go back to base or head directly to level 6 (southwest staircase), your call.
Castle Midpoint, level 6
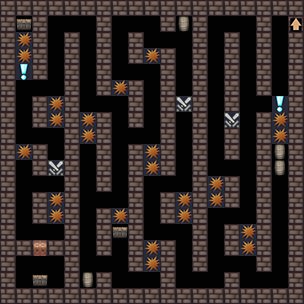
You start level 6 from the top right. Also note that there’s no way down from here to the 7th floor. This’ll also be the first floor with spikes on the ground.
Head down to the event, then west, down, and west through the battle event. Zigzag your way down around the spikes and head into the east corridor to open the barrels for a melting tonic. choose “Just tell her.” when prompted with the choice. After that go back and make your way to the second battle event, as well as the barrel behind it. It’ll contain a warp stone that you might need later on.
Now, again, work your way west and down, avoiding the traps in your way to reach the chest in the bottom center. It’ll contain a poison dust scroll. Next you’ll have to again make your way up and west, followed by moving all the way down to the chest in the bottom chamber. The chest holds the first key to the 8th floor.
If you want an elixir (Heals and restores entire party) you can make your way up to the northwest chest to retrieve it. Make sure your party is properly healed before stepping onto the trap tiles. After this you’ll need to warp out if you don’t want to get a game over.
Head back to level 5 and take the northeast staircase to reach level 7.
Castle Midpoint, level 7
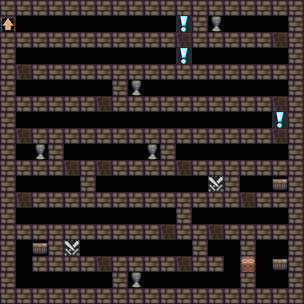
(I know this image isn’t entirely correct but it was confusing enough to make as it is)
In level 7 there’s only 1 way forward until you reach the first event. Then turn right to click on the right wall to slip through. (You can see the passable walls on the image above). Ignore the vase in the top right and make your way west to the next hidden passage down. Now go back east until you hit the wall and go down again.
All this back and forth might be getting confusing but you now you have to go west and down again to break the vase. It’ll contain a small mentality seed. After getting this go back up one row and move all the way east to the event tile. Once there, go one row south, then east to clear the first battle event.
Turn around to head west, then north, west, and south again respectively. Continue zigzagging to the second battle event in the bottom left, and continue your way to the chest in the west for a meditation scroll. Then make your way to the east chamber to get the second key from the chest.
Now go out of the chamber and to the last chest just to the north for the first shard of the lucky statue. You can then warp out if you feel like it, or make your way back to level 5. Your choice.
Castle Midpoint, level 8
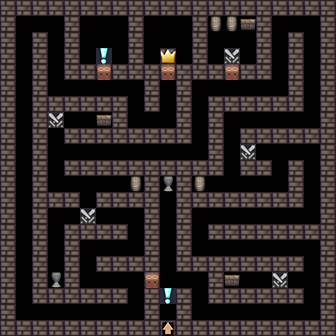
To get to floor 8 you must first make your way to the north door on floor 5, and fight your way past the big group of enemies to proceed down the stairs to level 8. Once you’re at the floor head straight forward to the vase ahead for 50 mana shards, then head back south and into the eastern passage. Go into the first fork and fight your way to a chest with 500 mana shards.
Now make your way to the chamber near the north east corner. One of the barrels will have a small dexterity seed and the chest will yield a tornado scroll. Once that is done make your way to the last chest, you’ll have to fight a level 17 witch bunny to get a bunny suit scrap from the chest. Then head for the vase in the bottom right respectively for a small resilient seed. Now make sure to unlock the door that leads back to the entrance hallway before continuing elsewhere.
If you decide to go back to base, note that the first shop battle will also be available. Then make your way through the western corridor up to the northwest room to watch the observatory event. If you’re playing the adult version it’ll also give you a succubus orb, which you’ll need for the boss room. Head for it now and meet the level 17 succubus, choose to let her have Ceri to unlock 2 CG scenes (adult version), then make your way back to her and fight her. Defeat her to unlock level 9 and yomi.
Second cave system, level 9
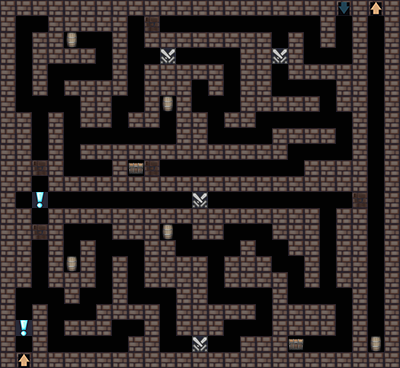
Level 9 has breakable walls which you can see on the image above. First make your way to the barrel just northeast of the starting point, it’ll contain 50 mana shards. After that head east to the first chest (you can ignore the other barrel in the bottom half of the map) for a poison bolt scroll. Then head north and smash through the eastern breakable wall in the middle corridor, and make your way up to the staircase (make sure your party is healed).
You’ll fight a level 22 Tribeswoman for a CG unlock and 2 medium strength seeds. Choose the stout bush for strength and vitality, the tea plant for a mental and a resilient seed, and the river reed for agility and dexterity. Once received, make your way back to the western end of the map, then head north through the breakable wall towards to barrel in the north for a small strength seed. Next you can navigate your way east, then south to reach the last chest hidden behind a breakable wall for your second piece of the luck statue.
Once received, head back towards the stairs leading down to level 10.
Second cave system, level 10
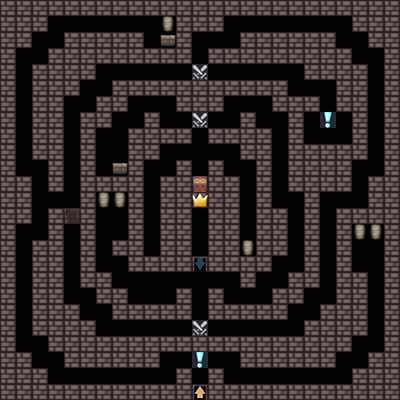
Once on level 10 first head through the eastern corridor to find a medium mental seed in one of the 2 barrels. Then loop all the way back to the chest in the north for another swimsuit scrap.
Now make your way to the inner circle and loop around to reach the event in the northeast, you’ll have to fight 3 level 18 mud girls to obtain a poison resistance seed. Then go back and break your way through the west breakable wall to get to the innermost circles. Ignore the 2 barrels in the western section but drop by the chest just north of the wall for a reviving balm, then make sure to check the last sole barrel before the boss room gate for 50 mana shards.
Head for the boss tile now to fight the level 23 tiger. You’ll get her CG after defeating her as well as access to the 11th floor. If you want to go back at least try to reach the teleporter on that floor first before heading back.
Shrine entrance, level 11
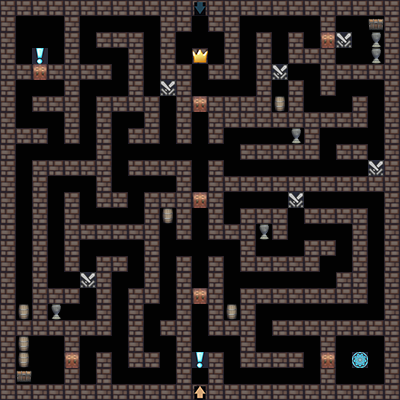
The first thing that you should do is to unlock the teleporter in first room through the corridor to the east of the entrance. Once that’s out of the way, move north to the first vase to find a warp stone, then loop back to the north side of the first door to unlock it.
Now head towards the southwest chamber for a mending tonic in one of the 2 barrels and a Thunder Chain scroll in the chest. Followed by the vase just north of the room, it contains a healing potion. Then head to the north side of the second door to unlock that one as well.
Next up is the room + event in the northwest of the map. You might want to choose to train some more before going there if your party is low, as you’ll have to fight a level 28 monk to defeat her and obtain her CGs. Bring your strongest physical or ranged attackers as magic user get penalized by her D-Shield ability. Defeating her will also reward Yomi with the same very useful ability.
Whether you leave her for later (you can always come back) or defeat her is up to you, but I do recommend paying a visit to the bottom of the western corridor to grab a medium vitality seed from the barrel. Next is the last barrel in the north east portion of the map. It’ll contain 25 mana shards. In the north east room you’ll also find 35 mana shards and a tribal cloth scrap. Now make sure to also unlock the final and 3rd door from the north side.
The boss fight on this floor is a fairly straight forward Fox Archer pack battle.
Shrine entrance, level 12 & 13
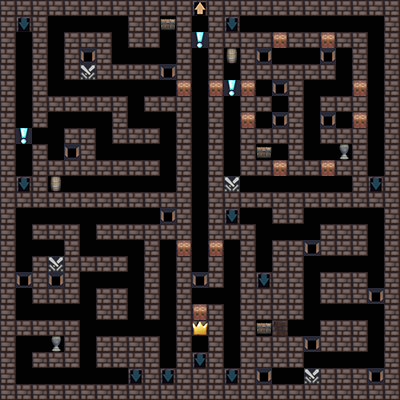
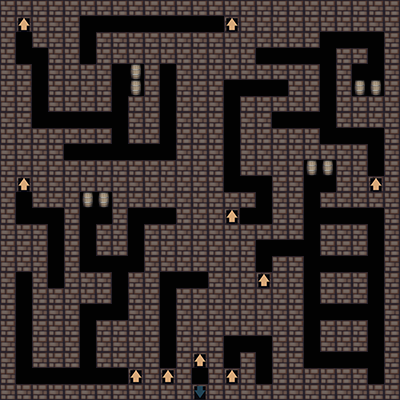
Floors 12 & 13 are connected through a series of pitfalls and stairs so be prepared for some confusion as you work through these. The doors in the center corridor are all locked from the other side so just make your way south until you fall into the first pitfall. Then go through the short corridor on level 13 to take the stairs back up to 12. You’ll end up in the southwestern portion of the map.
Once there, move north to unlock the first one from the set of four doors, then head for the vase in the southwest corner for a medium agility seed. Now make your way to the northeast pitfall in this portion of level 12, and fall down. Once on level 13, make your way to the west set of double barrels for a warp stone. After that go back south to use the stairs up, then move your way to the pitfall behind the battle event, fall down, and head up the stairs again to enter the northwest section of floor 12.
Head to the event first. If you want 60 mana shards you fall down the pitfall directly east of the event tile and find the double barrel on level 13 to get them. Then head back up and go east again to make your way to the northernmost chest. Make sure to unlock the door as you pass by (avoid the pitfalls for now). In the chest you’ll find 1000 mana shards. Now find the battle event in this section and fall down the pitfall behind it. Then head back up the stairs once again.
You’re now in the northeast section of floor 12. Walk past the first 2 doors (unless you want 35 mana shards from the barrels on floor 13) and enter through the north door in the eastern corridor. Ignore the vase and make your way to the sole chest in this section for a Toxic Bomb scroll. Walk back out of the room and continue along the corridor to the barrel for 75 mana shards. Then unlock the door to the central corridor just behind you and enter the other door behind you to fall down to level 13 again.
Walk through the corridor to get up the stairs to the last section of the 12th floor. Fall down through the first pitfall that you find and get a medium resilient seed from the pair of barrels on floor 13. Get back via the stairs and head for the chest behind the hidden wall for the 3rd piece of the lucky statue. Now make sure to loop around the pitfall as you make your way to the pitfall in the southwest part of this section.
Make your way up to level 12 again and be sure to unlock the last inner corridor door (don’t fall down!), then enter the final gate to the boss fight with the level 27 Fox Miko and her 2 archers. Once done, make your way to floor 14.
Shrine entrance, level 14
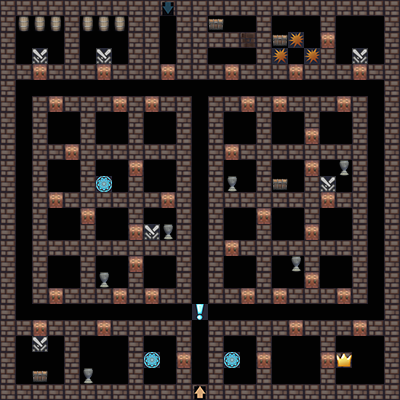
First unlock the teleporter in the western room as you enter this floor. Now might also be a good time to go back to the monk on level 11 if you haven’t defeated her yet. back on floor 14 you’ll find that this floor basically has a large set of rooms. So first head through the western corridor and into the first room to the south for a vase with 65 mana shards. Then into the chest room to the southwest for a chest with 700 mana shards. Now head for the 3-barreled room to the northwest and grab a warp stone from one of them.
The 3-barreled room next to it also contains a medium dexterity seed in one of them. Next head to the room with the hidden chest for a Holy Bolt scroll. Ignore the south door to the room next to it and make for the northeast room, then make your way to the trapped room with the chest for an elixir. Now head back out and all the way south, then through the maze of rooms for the last chest. It’ll contain a tiger cloth scrap.
Next up is the second teleporter in the western maze of rooms, so make your way northwest and work your way there. Use it and head for the boss (also unlock the north door in the second chamber), to battle a level 28 Fox Miko. You’ll now have the key to unlock the north door and head down to level 15.
level 15
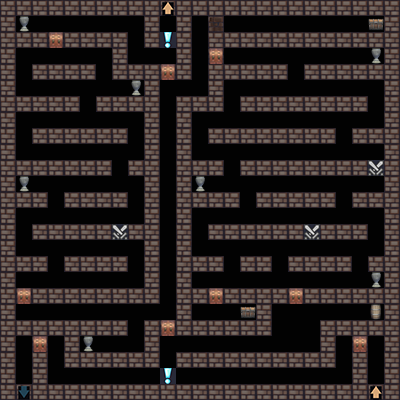
Head through the corridor and down through the western door. From here you’ll first need to take the shortest possible route to the southern door, a single step too many will mean you won’t be able to unlock the door and you’ll have to do it all over again. Stick to the eastern side of the corridor until you reach the battle event, then move west. Once the south door is unlocked don’t go back through for any of the vases, they only contain 45 mana shards anyway. Besides, the door will be locked once again if you do.
Now move east and drop by the south vase on your way for a healing potion, then continue on your way through the long corridor to unlock the north door. Next go through the hidden passage for another shard of the lucky statue, the fourth. Go back out of the passage and through the door just south of it. This’ll start another timed door unlock, so ignore everything and make your way south via the shortest route. Stick to the eastern side again and switch west just north of the second battle event as you make your way down. Ignore the chest room for now and go through the second door. We’ll get back there.
Head for the east barrel for a medium strength seed, then head for the main corridor to unlock the south door. Walk up all the way north and head into the timed room on the right once again. Stick west this time, ignoring by the western vase (only a warp stone in there) and simply go directly for the chest room to get a maid outfit scrap. Now you can either warp out or head back north out of the room, your choice.
After that’s done make your way south to the event tile, then east for the stairs leading up. You’ll have to fight a level 35 Nine Tails (Use magic resist characters if you can) to unlock her CG and the Dual-Soul ability for Yomi.
Finally, head over to the last stairs to reach level 16.
level 16
Floor 16 and up can be found in part 2 of this walkthrough.


