
This is the second part of the Sakura Dungeon walkthrough. It holds maps and guides for floor 16 and up (or down if you prefer).
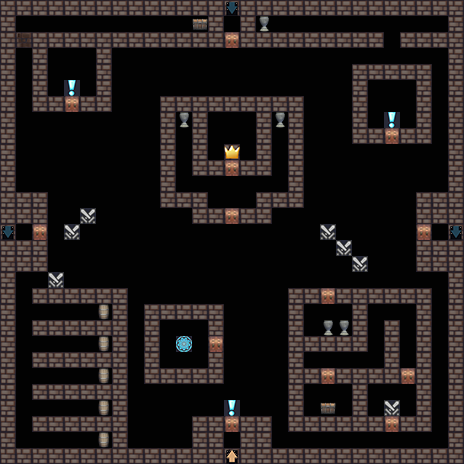
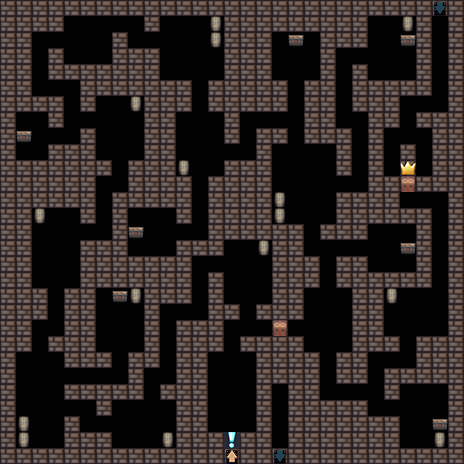
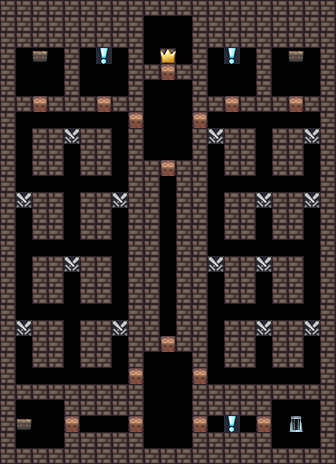
Shrine Throne, level 16
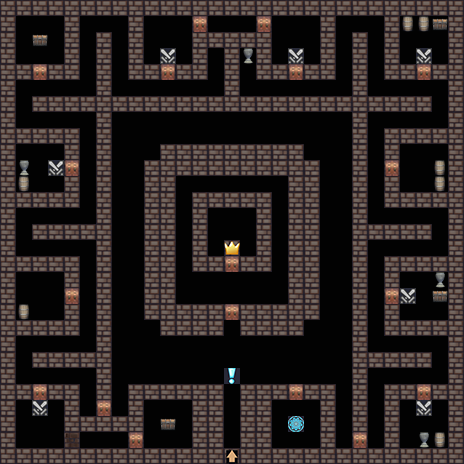
Once on this floor, head for the teleporter in the room just east of the starting point. Next head for the barrel in the southeast corner for a warp stone. Then move one room north for 1000 mana shards in the chest. And in the double barrel room north of that you’ll find a healing potion in one of them.
Once received, head for the room in the northeast corner and get ready for a fairly big battle. Open up the chest after the battle for a Dragon Key, which we’ll need for the northwest corner. Start making your way there and drop by the vase on the way for 90 mana shards. Open the chest once you reach the room to retrieve the Dragon Orb, it’ll weaken the floor boss’ level from 38 to 35.
Now make your way 1 room south for a medium agility seed in the center vase. The barrel one room south will contain 80 mana shards. Finally, the last chest behind the hidden wall will contain an air resistance seed. After that it’s time for the boss room in the center of the map. Make sure to use a variety of attacks on her because of her E-Skin ability.
After you defeated her add Maeve to your party (if you don’t have her already) and enter the throne room again for some knight on dragon girl action (CG Unlock). Now head back to town.
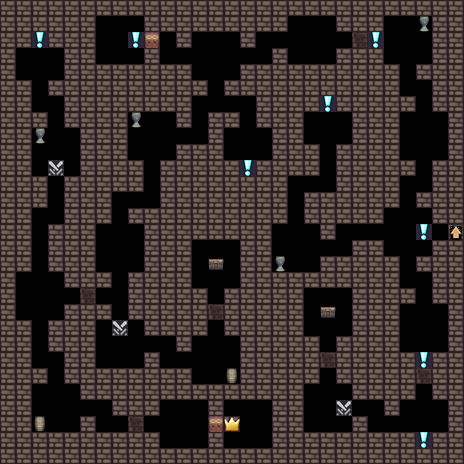
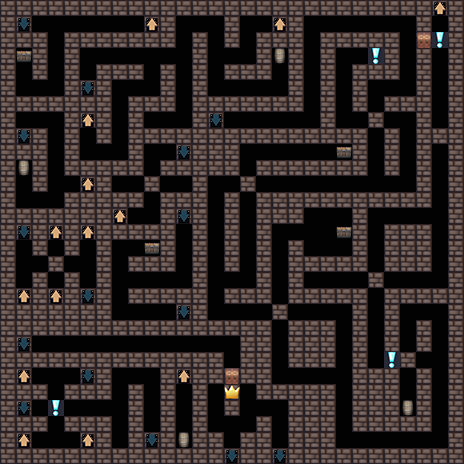
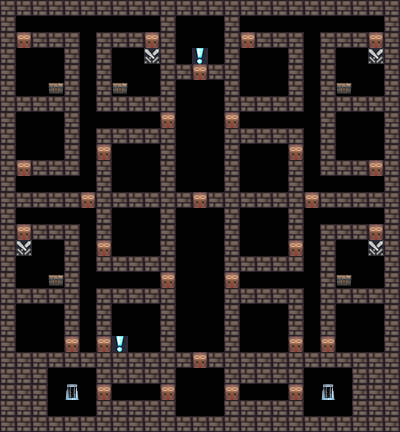
Third cave system, level 17
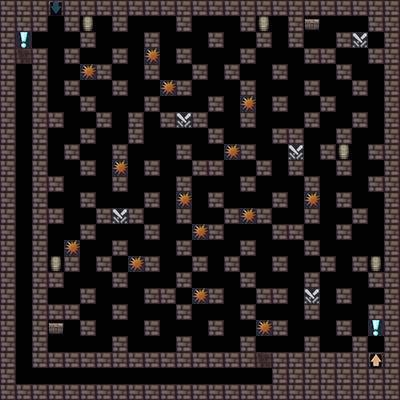
If you have a map image, then floor 17 is a pretty easy map. First head north to the second barrel for a new warp stone, then head on to the chest for an avalanche scroll.
Next, you’ll have to make your way all the way southwest to the second chest for a reviving balm. You’re best of by heading all the way south first, and then turn west. Once taken, head north to the barrel just north of the chest you are at for a medium dexterity seed. Now head for the exit (remember you can always use the secret passage on this floor for quick transport), unless you want the 95 mana shards from the last barrel. In that case you’ll have some more moving to do.
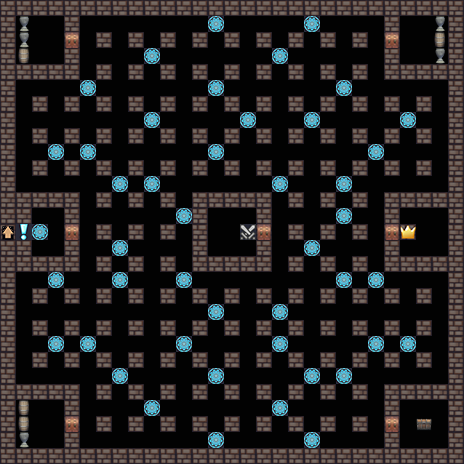
Third cave system, level 18

Ignore the barrel to the east of the entry point but do head for the event room to fight a level 39 Fox Knight to unlock her CG and obtain an ice resistance seed.
Now head back out and move to the double barrel just west of you. One of them holds a medium strength seed.
Next head for the second chest in the north for a Terrorize scroll. Then move all the way south to the hidden chest for another lucky statue shard. After that move back out of the corridor and then head north to the boss room. Drop by the barrel on your way for 110 mana shards. The boss is level 40 Queen Bee. You’ll need to defeat her to proceed to the next floor so train if you need to. Now head down to the next floor, we’ll come back here after level 20.
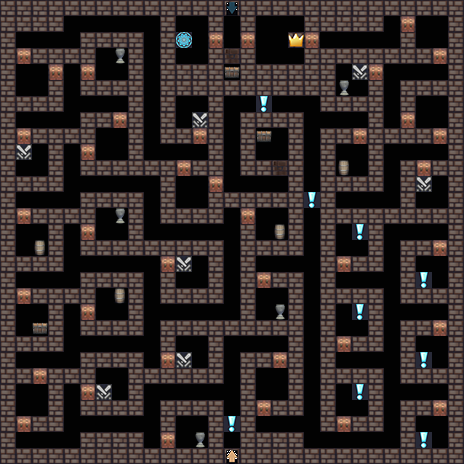
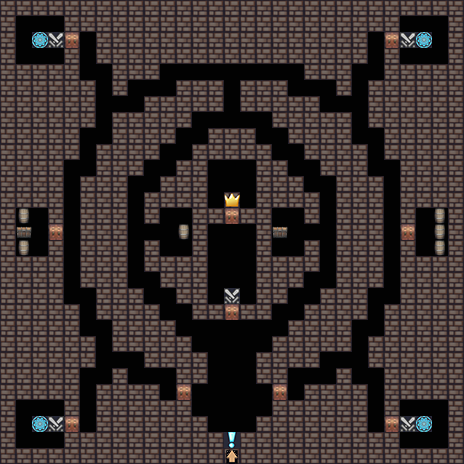
Pyramid entrance, level 19
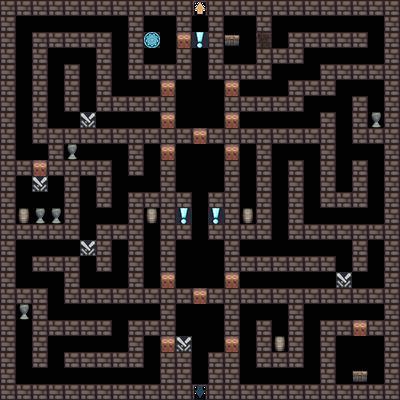
Walk into the west room to unlock your teleporter. Now head into the first eastern corridor to get a Chocolate Puzzle from the hidden chest. Then back out and onward into the top western corridor. In the vase/barrel room you’ll find a Medium Vitality Seed.
Now head into the second eastern corridor and make your way through the corridors to the door that leads into the central area. Ignore the vase on your way. In the central area, go north and unlock the eastern lever, then continue and take the eastern barrel for 125 mana shards. Head back and press the western lever this time, then unlock the northern door before going through the north west door.
In the corridor go all the way to the southwest vase for a Mending Tonic. Then go east through the door to fight a level 42 assassin. Her S-Field ability will give her more dodge chance for ranged and magic attacks. So melee attacks will have the most effect. Note that the first time after defeating her you’ll have to fight a level 35 version of her with just Yomi, the next time you head into town. But first you should head for the central corridor again to press eastern lever again. Then head down and go for the east chest for a lingerie fabric scrap. The vase in there yields nothing.
Once received, head back out and head for the next floor.
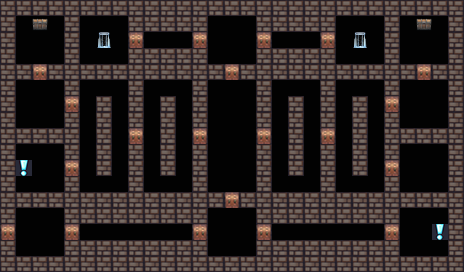
Pyramid entrance, level 20
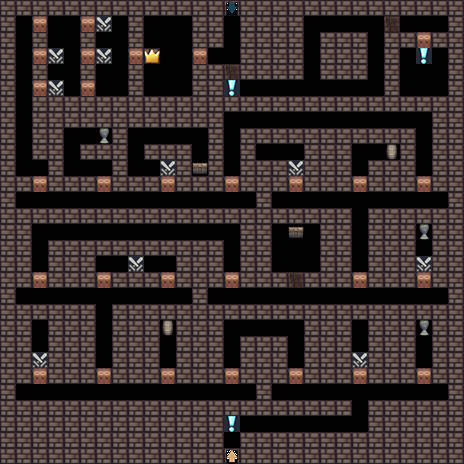
Once at floor 20, make your way through the initial corridor and immediately head west to the first barrel for 105 mana shards. After that move towards the chest behind the hidden wall. It’ll contain an jeweled chalice which we’ll use for the queen bee soon. Next head for the eastern vase (behind the battle event) for a medium mental seed.
Once in the third row of rooms, use the easternmost door to make your way west. Head for the chest first to obtain a Thunder Storm scroll. Then go one room to the west for a warp stone.
Now you can make your way through the enemies (or walk past) to the boss to take on a level 44 Noblewoman and 2 lackeys. She has a D-Shield ability as well as strong poison attacks. If you can’t defeat her you might as well consider going back to the Queen Bee on level 18 first, to recruit her with the newly received jeweled chalice. The queen bee also has high poison resistance.
If you do manage to defeat her without the queen bee, don’t forget to still go and get her. You’ll also receive a new CG if you do.
Before you go down to floor 21, make sure to drop by the hidden room in the east. You’ll find a chocolate mimic in the chest. Be sure to save before opening the final door if you’re running the adult version of the game. Choose “Try to negotiate” first, for a CG unlock.
Once that’s done load up your save and fight her this time instead (Level 45) for another CG unlock.
Finally head over to floor 21.
Pyramid Apex, level 21
Important: Don’t capture your 3rd cow before entering the boss room at least once. Your game might get stuck and you’ll have to load an earlier save.
Head out of the spawn room and into the first room on your left to unlock the floor 21 teleporter. Also note that level 21 is another floor that has multiple stairs leading down. The western staircase will lead to floor 22, the eastern one to 22, and the north one to 23. From this level on you’ll also encounter Abyssal Cows, we’ll need 3 of them later on, but first make sure to visit the boss room to trigger her event (You won’t fight her). After that make sure to focus on capturing at least 3 cows (Remember your capture skill will only work if you’re of higher or equal level to the enemy). The cows are level 43, and you’ll need them later on in this level.
Now head for the chest in the southeastern section of rooms to obtain a wedding dress scrap. Then make your back out of the room and head north to fight all 3 enemy tiles to get a few more cow battles in. Then continue going north to get a large agility seed from the vase in the northeast corridor (Ignore the event room for now, we’ll get back later). Next is the hidden chest in the northwest, again ignore the event room on your way there, we’ll go back there after capturing an Exalted Angel. Open the chest for the last piece of the lucky statue. Head back to town and enter the shop to complete it and get an increased chance to find items after each battle.
Go back to level 21 and go to the barrels in the west for a medium resilient seed in the middle one, and a mending tonic in the bottom one. Now it’s the time the capture those 3 cows. So if you aren’t level 43 yet with a capture skill user, grind your way to level 43, fight the 3 cows in the eastern section of the floor (the battle tiles) and capture them. Once you have them head back to town once again to start the cow milking event and obtain cow milk. You’ll need to capture a new cow after this if you want to add one to your collection.
Finally, head back to level 21 and make your way to the boss room, dropping by the west vase for 135 mana shards. Then head into the boss room to unlock the western door to floor 22. Head for it and go down to the new floor.
Pyramid Apex, level 22
(Note: Level 22 has walls that can be removed via a lever, these walls are marked on the map with the “hidden” wall graphic.
On level 22, first head straight ahead in western direction, then north (ignoring the vase) to the event tile to find the first lever. Pull it down and head back out, then all the way south to pull the lever up again. Continue west and head for the chest room to find a reviving balm.
Go back and pull the lever down again, then make your way north. Once there, head west and ignore the event room. This is another room we’ll come back for later (after encountering your first Abyssal Goat). Head south once you can and ignore any lever events as you break a vase for a healing potion and another barrel for a large strength seed on your way to the second chest. In the chest you’ll find a bondage fabric scrap.
Now you’ll have to make your way back up to the lever event just north of this room to pull the lever up. Once that’s done, head back south and then into the western corridor. Drop by the northern vase for a large dexterity seed. Then continue north to pull the lever down again before going all the way south toward the boss room.
Fight and defeat the level 49 Whip Wielder and her guards to get a Golden Key. It’ll unlock the door to level 24 (Not a typo). If you’re having trouble, make sure to bring some magic wielders to avoid her parry ability. Warp or walk back out to level 21.
Pyramid Apex, level 23
To get to level 23, first make your way to the northeastern event room on floor 21 (another library). Upon opening the door you’ll unlock a CG and you’ll have to fight a level 47 Hammer and Noblewoman. After defeating them you can make your way to the eastern door to reach level 23.
Once there, step over the teleport symbol on the floor and enter the level proper. Be careful from here on to avoid all other teleporters on the floor. They’ll bring you back to the start of the floor (Unless mentioned in the guide). Make your way north to the northwest room to get a large mental seed from one of the vases. Get out of the room and step onto a teleporter to get ported back to the start.
Move south this time to get a healing potion from the southwest room. Then zigzag your way to the chest in the southeast room for a ribbon scrap. Once that’s done, head back the way you came and fork to the event room in the middle of the chamber to fight a level 52 Sand Sentinel. She should be fairly easy despite her high level. Once defeated she’ll be added to your growing group of subordinates. Also, be sure to enter the room once more (without her in your party) to unlock her CG (Adult only).
Continue on to the northeast room to get 150 mana shards. Then it’s time to make your way to the boss room to fight a level 52 Exalted Angel. This fight should be more difficult than the Sand Sentinel so train a bit if you need to. After defeating the Angel you’ll be able to add her to your party and you’ll also obtain the warp gem. Use it to warp out back to town.
Pyramid Apex, level 24
Note: This floor has 6 levers which will open up the wall next to the event in the long vertical corridor near the center of the map. You can find these in the small rooms in the southeastern section of the map.
Before we head to level 24, add the Chocolate Mimic and the Exalted Angel to your party and head to the northwest event room on floor 21. Entering will unlock a new CG as well as give you a chocolate bar which you can bring to Isabella for a new outfit. Then enter the room once more to unlock an Exalted Angel CG piece. Once obtained you’re free to adjust your party as you see fit before heading down to floor 24.
Once on the floor immediately head all the way west, then north through the empty room, then east and peek into the barrel room on your way for a large vitality seed. Continue your way north, ignoring all the rooms except the most northern vase for 120 mana shards. Now head east to the chest behind the hidden wall. Open it to obtain the Dragon’s Gift. We’ll use it in a moment, first you should head out of the room, save, and then make your way to the enemy just north of the room. You’ll have to fight a level 53 enemy.
Once defeated, go straight ahead to obtain a warding stone from the barrel in the room, then make your way south. Drop by the vase room as well for a Mending Tonic, then unlock the door that leads back to the entrance stairs. You have probably encountered at least one Abyssal Goat by now, if not, wander around the floor some more. Once you’ve seen one, warp out and head back to floor 16, make your way to the boss room and give her the statue to add the Ryuuou to your party (level 51). Now warp out and adjust your party as you see like then head to floor 21, and onto floor 22. Go into the event room to unlock 2 new Ceri CGs, then head back to floor 24.
Head for the 6 rooms in the southeast. We’ll go by them in a set order to unlock all the right levers. First stop is the southwest room. Enter it and step onto the lever event. Next is the northeast room, followed by the central western room. Then cross over to the central eastern room for door number 4. The fifth lever is in the northwest room, leaving the southeast room to be the final one. So head north through the central corridor, and turn east at the newly opened wall.
Make your way north and drop by the room with the vase for a large resilient seed, before heading towards the boss room. You’ll battle the 2 level 54 twins Emma and Ella, bring a strong batch of magic users if you have trouble defeating them. Once defeated, move on to the hidden chest to find some Divine Jewels which you can turn into an outfit. Then head down to the next level at least once to unlock the floor and read the event. Then head back to town if you wish to do so.
Abyssal Gateway, level 25
There’s only 1 real way through this floor. Head straight ahead and drop by the barrel to get a huge mental seed, then make for the double barrel in the southwest for a warding stone. Drop by the chest just northeast of your current position for a new elixir, and ignore the next 2 barrels on your way north, although you can drop by the western chest to battle a mimic for some more xp if you want, but it’s not required. One of the 2 barrels in the northern room contains 200 mana shards.
There’s another mimic in the first room southwest fork of the way down, as well as a mimic in the north central room. Fight or avoid them, your choice. But be sure to drop by the most northeast room for an abyssal shard (clothing fabric). Once obtained, turn back south and drop by the next chest just east of the path if you want to battle another mimic. After that open the door to entrance so that you have an easy way back here in case you want to head to town.
There’s another mimic in the southeast chest but the barrel contains a huge agility seed, so make sure to grab it. Move north to the boss room to fight a level 57 boss with 2 lower level minions. She’ll join your party as a level 55 minion once you defeat her. Then continue down to floor 26.
level 26
(Note: level 26 has rotating illusions)
Head south and face the western wall when you get to the “illusion” to get past it. Continue heading south and hit the next rotator from the north, facing the east wall. At the rotator north of the first barrel, face north as you head into it to get send to the barrel. Open it for a huge vitality seed. Face the western wall as you head back out of the short corridor to get back on the path.
Approach the next one from the south and face west to go north toward the chest for a Holy Slash scroll. Head back and backpeddle into the rotator, then face south and do it again. Now you can move forward to continue west then north. Face the next one from the south and turn south as well when you go into it. No need to go to the chest unless you want to battle a mimic. Continue on and take the first fork north to walk straight into the next rotator. Head through the corridor to the event tile to find Emma. You won’t need to fight her, so head back and walk straight into the rotator again to continue through the corridor until you reach the stairs, make sure to unlock the door on your way.
You’re now in the northwest. Head straight on, and into the south fork to fight a mimic if you wish to do so. Then move down the stairs again. It’ll teleport you north, just north of the barrel there. Hit it to get 250 mana shards. Navigate west and use the stairs leading down first, to get teleported to the barrel in the south. Open it for a huge resilient seed then head back and walk around to the stairs leading up.
In the southwestern area, head on to the event tile to find Ella and have the reaper twins join your party. The rest of the map doesn’t yield anything, so let’s head for the boss next. Take the northwest stairs leading up. Approach the next rotator facing east and head up the next stairs. You’ll find yourself in the room with the rotator and 6 set of stairs. Take the northeast one to find yourself in the last western room with a barrel. Head for the next stairs and then move east toward the boss room. Fight the level 60 succubus and her 2 lower level aides.
After defeating her, go around the rotating wall and head down the stairs to the next floor.
Anubis and training
(Note: If you’re still in the low 50s at this point I recommend going back to town to adjust your party and also head to floor 21 so that we can recruit Anubis. If you think you’re high enough you can do this part after level 27).
Head to the boss room on floor 21 to fight a level 56 Anubis. Defeating her will add her to your part. Then make your way back to level 27 and fight as many enemies as you can to train.
level 27
Head north and take the eastern fork, pick up the elixir from the chest, and continue on north. Head to the northwest room to break the seal inside and continue down south. Open the chest and one of the barrels for a Holy Arrows scroll and 300 mana shards before moving to the southwest room. Break the seal and move back to the main hallway.
Use the the western fork this time and pick up the huge dexterity seed from the barrel on your way north. Break the seal in the northeast room and head south. There’s a huge strength seed in the middle barrel, so make sure to pick it up. Then clear the last seal in the southeast room and head toward the boss room.
Behind the first door awaits a group of 7 enemies, so beware and make sure your party is healed before engaging. After defeating them head forward and prepare to fight the level 62 Vesta. She’s a little bit annoying with her resistances and high regeneration but shouldn’t be too difficult overall. Flow combined with Holy/Astral attacks should do the trick if you have troubles. However, once you defeat her she’ll resurrect with Dual-Soul and you have to fight her again as a level 63. It’s a difficult fight so train even more if you have to, auto-fight and spacebar speed things up by a ton.
Once defeated you’ll see the ending credits and return to town.
Unidentified Flying Object, level 1 (Level 28)
To unlock floor 28. Head to level 5 and make your way to the event room in floor 8 (just go north), to fight and defeat a low level wand witch. You’ll also unlock her CG in the proces.
Warp back to town and use Explore Dungeon to find this floor.
You’ll start in the southwest of the floor. Just move straight on to the event tile in the southeast to press a button. Go back to the central room and through the north door. Once in the next corridor head for the event tile in the west rooms to press another button. Go north to the chest to find a healing potion. Now move all the way northeast to find a large vitality seed and large strength seed in the next chest.
Finally, head over to the western teleporter and teleport to the next level.
Unidentified Flying Object, level 2 (Level 29)
Most doors on this floor will need a keycard to open. Make your way to the central corridor, then head to the southeast chest for the first level keycard. Then make your way over to the western chest for a ball lightning scroll.
Now train if you need to, until you’re strong enough to defeat the level 68 commander in the top northern room. You’ll get a master key once defeated. With it, first head to the northeast chest to get a physical resistance seed. Now go back to the northwest chest for a large mental seed and large resilient seed. The chest just east of that holds 3,000 mana shards.
Once collected move all the way south to the final event. You’ll get a CG unlock first, then release her to fight a level 69 enemy. Defeat her to add Chika to your party. Then head for the eastern teleporter to warp to the final floor.
Unidentified Flying Object, level 3 (Level 30)
The last level! First head to the southwest chest for some carbon fibre sheets. Then move into the big area just north of it and head all the way north. Pick up an elixir from the chest and then move to the event tile to press the first button. Now move all the way back down and do the same thing on the east side of the room. (There’s a large agility seed and large dexterity seed in the chest).
Now it’s on to the level 70 boss. Defeat her and then head back to town to unlock the last costume and to get your last CG from the “Walk around town events”
Done!
You’re now done and should also have all CGs if you followed the entire guide, captured at least 1 of most enemies (whenever possible) and did all the town events. I might add a complete CG list later.